|
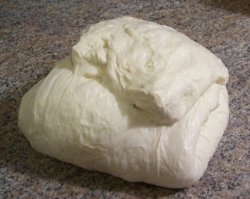
The Secret of Great Bread: Let Time Do the Work The Stretch and Fold Technique Kneading the dough has been the most laborious part of bread baking for me, but it was necessary to achieve the development of the gluten that gives the bread its structure and texture. However, new techniques have been developed that eliminate all of that. The purpose of all kneading techniques is the same: to stretch and align strands of gluten. The traditional kneading method is to fold the mass of dough on itself, press it together with the palm of the hand, turn, and repeat. With very high hydration doughs traditional kneading is almost impossible as the dough will hopelessly adhere to the hands. This technique is used to reduce hand contact with the dough as much as possible. A dough scraper is used to gather and fold the dough which is laid over on itself instead of being pressed. The result is the same as normal kneading but only the fingertips come in contact with the dough. After just a few turns the gluten sheets will align and the dough will still be tender but much less sticky. This allows for more hydration of the dough (a stickier dough) that will emulate the textures of the artisan breads. The more hydration, the crustier the bread will be - the landmark of artisan bread. In mixing the dough, you will be able to add a little more water. While many of the recipe directions still have the 'kneading' process, you can use the stretch and fold method in place of those directions - it works with any dough. I was first introduced to the Stretch and Fold method while taking an online Master Baking course by Peter Reinhart... and a whole new world of baking opened up. Stretch and fold encompasses the idea that it's the hydration of the flour that causes the gluten to form.....previously kneading was the chosen method. From the mixing to the inital rise of the bread, things have changed: Mixing the dough: I've learned to follow formulas for bread making, rather then recipes, but for now, let us just stick to the recipes. You begin by combining all of the dry ingredients in the mixer bowl with the paddle attachment. When you are ready to go, add all of the wet ingredients at one time and mix for 1 minute, or until you see the dough pulling away from the edge of the bowl and picking up all the loose flour. Turn off the mixer and wait for 2 minutes... in the meantime, switch out the paddle blade to the dough hook. Check the dough - it should be sticky, but not wet. Add a tiny bit of water to loosen the dough, or a little bit of flour to dry it out a bit. This process is something you learn with experience, so the only way to learn is to do it and see the results. Weather, house humidity, etc... all these factor in to the consistency of the dough. On a rainy day you will have to add more flour - in the winter when the house is heated and drier, you will probably have to add more water. Turn the mixer on and let it go for 2 minutes. During this time select a place on your counter to let the dough rest. Create an 'oil spot' with some olive oil (this won't affect the bread end result at all) When the 2 minutes is up, plop the dough onto the oil spot. Stretch and Fold:  With oiled hands stretch the dough towards and away from you, then fold the top half to the middle and then the bottom half to the middle.
Turn the dough over, turn it 90 degrees and do the stretch and fold again. Turn the dough over. Place the mixing bowl over the dough and walk away.
Find something to do for 5 or 10 minutes and then repeat the stretch and fold process. Do this 4 times. With oiled hands stretch the dough towards and away from you, then fold the top half to the middle and then the bottom half to the middle.
Turn the dough over, turn it 90 degrees and do the stretch and fold again. Turn the dough over. Place the mixing bowl over the dough and walk away.
Find something to do for 5 or 10 minutes and then repeat the stretch and fold process. Do this 4 times.
The 'windowpane' test.... to see if the dough has developed enough we do the 'windowpane' test.. pull up one pinch of dough and stretch it as much as you can.. it will thin out, creating an almost 'see-through' look. What you are seeing are the gluten strands developing and holding the ingredients together. You might want to do this on the first stretch and fold and the ones following to see the development of the gluten for yourself. Place the dough in a clean bowl that you have oiled..... turn the dough over (so that the top is oiled).. cover and let it rise for an hour or two. It should at least double in size. Shape the loaves: Decide ahead of time just how you want to use this bread....sometimes making a loaf is appropriate for sandwich breads, a 'boule' is appropriate for a more artisan look, or a batard might work as a bread with an artisan look, but having decent sized slices for sandwiches. This time you want to sprinkle some flour on the counter to work with the dough. Dump the dough out, but do not press it down (you don't want to deflate it any more than you have to) it's the gases that have developed in the 1st rise that give it texture.  A scale is so handy with shaping the loaves. If you have one weigh the dough....if you have 2lbs, then you can make two 2pound loaves or batards.
Half the dough and weigh it again, adding or subtracting dough to equal 1/2 of the original weight. Set one half aside and work on the first half.
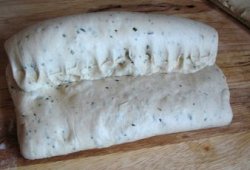
Flatten the dough out, without pressing down on it (again, you don't want to deflate it more than you have to).... for a loaf, or a batard, fold
the bottom half of the dough up to the middle line and press the very edges to seal it there (sounds like a conflicting direction to 'don't deflate',
but it really isn't, you are adding structure at this point)... bring the top half down to the middle point and do the same sealing. Now fold the
dough at the mid-point so that the top and bottom come together and pinch that seam. This is important so that when the dough rises a second time
it doesn't 'blow out'. A scale is so handy with shaping the loaves. If you have one weigh the dough....if you have 2lbs, then you can make two 2pound loaves or batards.
Half the dough and weigh it again, adding or subtracting dough to equal 1/2 of the original weight. Set one half aside and work on the first half.
Flatten the dough out, without pressing down on it (again, you don't want to deflate it more than you have to).... for a loaf, or a batard, fold
the bottom half of the dough up to the middle line and press the very edges to seal it there (sounds like a conflicting direction to 'don't deflate',
but it really isn't, you are adding structure at this point)... bring the top half down to the middle point and do the same sealing. Now fold the
dough at the mid-point so that the top and bottom come together and pinch that seam. This is important so that when the dough rises a second time
it doesn't 'blow out'.
Now you have a loaf or batard shape.... for a loaf, drop the dough into a prepared loaf pan, spray the top with oil, cover and let rise. For the batard, roll the dough 'loaf' to give it shape, making sure to 'pinch' any of the seams that might have come loose. Place batard on a cookie sheet lined with parchment paper, spray the top with oil, cover and let rise. The second rise can take anywhere between 1/2 - 1hr. One aside here - you might want to create some cuts in the top of the loaf/batard before you cover it - this can also be done after the rise just before baking - but it allows some expansion of the dough while it bakes. Baking the Bread: Breads bake at different temperatures for different lengths of time - it's best to just follow the directions on the recipe. For a crusty bread you will need to create some steam in the oven. Once the bread is in the oven, use a mist sprayer and spray to top of the bread, and you can also put a cake pan in the oven and add 1 cup of water (or you can do both). Again, this is something that is learned with practice and once you get a 'feeling' for when it's done, you're good to go. There is one little test - the bread is done when you can 'knock' on the bottom and it's firm. Back to yeastbreads or Miscellaneous |